Welcome to my captivating corner of the internet. I'm Parastus Nghiilwamo, a final year student at NUST (Namibia University of Science and Technology), and It is with great pleasure that I present to you a glimpse into my world of expertise, passion, and dedication. Thank you for taking the time to visit my growing blog/portfolio site. I hope my work resonates with you, and I look forward to connecting and collaborating with like-minded individuals who share my goals for technology and its potential to shape our future! :D .
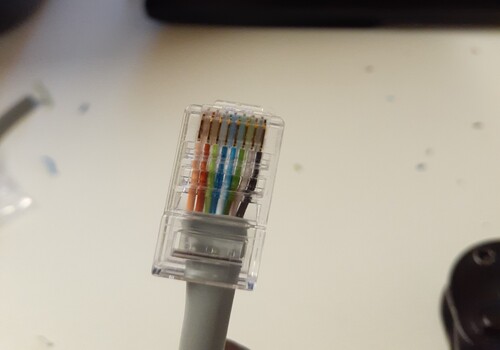
My first completed Ethernet cable, assembled during my time at Voraltex. Following industry standards and best practices, I carefully terminated the RJ-45 connector, ensuring each wire was precisely aligned and secured according to the T568B color sequence.
I utilized essential tools like a cable stripper for clean wire preparation, a crimping tool for securely terminating the RJ-45 connector, and a cable tester to verify connections and troubleshoot any errors, which in my case, there weren't any. ๐
come back later to see what i'm working/worked on :*
The Docker-bench for Security tool is an open-source script which analyzes numerous standard best-practices when deploying Docker containers in a production environment. The fully automated tests are designed to locate issues with your configuration based on the CIS Docker Benchmark v1. 3.1 standards.
git clone https://github.com/docker/docker-bench-security.git
cd docker-bench-security
Docker-Bench-Security v1.3.6 loads. Wait for a few seconds; the status of the current Docker configuration is displayed, as shown in the screenshot below.
The [WARN] line in red color indicates the security warning, and the configuration needs to be changed according to the provided information.
The [INFO] line in blue color provides information about the security.
The [PASS] line in green color shows the escaped configuration test.
These warnings can be resolved by configuring Docker daemon securely. The Docker daemon is a service to run Docker. This service can be configured using the JSON file, which is useful for keeping all docker configurations.
โโโโโโโโโโโโโโโโโโโโโโโโโโโโโโโโโโโโโโโโโโโโโโโโโโโโโโโโโโโโ
-๐ฌ๐ต/๐ฎ๐ฌ๐ฎ๐ฐ
In this project, I demonstrate how to implement mobile device security using the Miradore Mobile Device Management (MDM) solution. This lab covers key aspects of deploying, securing, monitoring, and managing mobile devices using Miradore's cloud-based MDM solution. ๐ฑ๐ ๏ธ
With the rise of BYOD (Bring Your Own Device) policies in organizations, it is critical to implement robust mobile security solutions. Miradore offers an effective MDM platform to control and secure company-owned and employee-owned devices, reducing support costs and mitigating potential security risks. This project simulates a scenario where security professionals must utilize Miradore to manage mobile devices in a work environment.
I registered for a Miradore account and activated the service here ; https://online.miradore.com/login/Register2
& Complete the registration process.
To do this, I installed the Miradore Online Client app on the Android machine. In the Miradore dashboard, I created a user profile for this device, inputting details such as the userโs name and email. This profile would allow the device to be associated with a user in the company.
(To manage IOS and MacOS devices, you need to connect Miradore to the apple Push Notification service. this can help : https://youtu.be/djP5D72rqrc )
Once the user was created, I generated enrollment credentials within the Miradore dashboard. These credentials were then entered into the Adroid deviceโs Miradore client app, which connected the device to the cloud platform. The connection was confirmed, and the device was successfully enrolled, allowing me to remotely manage it through the dashboard.
With the Android device enrolled and secured, I returned to the Miradore dashboard to explore the various management options available for the device. The dashboard provided real-time information about the device, including its status, location, and the last synchronization time with the cloud platform. This information is invaluable for security professionals looking to monitor devices actively.
One of the key features of Miradore MDM is the ability to remotely reset a device's passcode.
I used the Reset Passcode function. In the dashboard, I selected the Android device and reset its passcode. This can be done either by sending the new passcode to the user or viewing it directly as an administrator. This feature is useful for assisting users who forget their device passcodes.
An essential feature of any MDM solution is the ability to secure a lost or stolen device. To simulate this scenario, I used Miradoreโs Lost Mode to lock the enrolled Android device remotely. By accessing the Security section in the dashboard, I was able to activate Lost Mode, which rendered the device unusable until it was unlocked by an administrator.
A Black screen will be displayed n the device, indicating the device has been locked and blocked
This project highlights the practical use of the Miradore MDM solution to manage and secure mobile devices in an enterprise environment. From the initial setup and enrollment of devices to advanced security features like resetting passcodes and locking lost devices, Miradore proves to be an invaluable tool for organizations looking to secure their mobile infrastructure. By leveraging the cloud-based MDM system, administrators can reduce downtime, improve device security, and protect sensitive company data from unauthorized access.
-๐ฌ๐ต/๐ฎ๐ฌ๐ฎ๐ฐ
Now, this application can't actually tell your fortune and you probably shouldnt take any advice from it, But what you can do is ask any question that you like, and the application will tell you yes or no. ๐
Access here:(took this link down)
For a school assignment, I collaborated on a comprehensive performance management system for a simulated university department, showcasing expertise in ๐๐ฟ๐ฎ๐ฝ๐ต๐ค๐ API design, Ballerina programming, and database integration (MySQL & MongoDB).
My tasks included defining GraphQL schemas, implementing client-server interactions in Ballerina, and contributing to a scalable performance tracking architecture.<
I've also engineered a microservices system to streamline specialist appointments requests. I designed and implemented communication within the microservices utilizing ๐๐ฎ๐ณ๐ธ๐ฎ messaging, managed MongoDB/SQL database persistence, and built containerized services with ๐๐ผ๐ฐ๐ธ๐ฒ๐ฟ.
Overall, exploring Ballerina has been a rewarding experience, and I gained valuable insights into its capabilities. :)
In response to the ever-evolving threat of cyberattacks, I engineered a robust ๐๐ฃ๐ฉ๐ง๐ช๐จ๐๐ค๐ฃ ๐๐ง๐๐ซ๐๐ฃ๐ฉ๐๐ค๐ฃ ๐๐ฎ๐จ๐ฉ๐๐ข (๐๐๐) utilizing the capabilities of OSSEC. Within this simulated network setup, I meticulously configured an OSSEC agent on a Debian-based ๐ ๐๐ ๐ฌ๐๐ซ๐ฏ๐๐ซ, enabling it to closely monitor system logs, file integrity, and potential malicious activity. To proactively safeguard this server, the IPS dynamically integrated with an ๐ข๐ฆ๐ฆ๐๐ ๐๐ฒ๐ฟ๐๐ฒ๐ฟ for threat detection and automated countermeasures.
To frankly demonstrate the effectiveness of my IPS implementation, I orchestrated a simulated ๐๐ซ๐ฎ๐ญ๐-๐๐จ๐ซ๐๐ ๐๐ญ๐ญ๐๐๐ค scenario using a Windows client-machine. As the attack unfolded, OSSEC diligently monitored for suspicious behavior, generating detailed alerts and successfully triggered my pre-configured response to effectively ๐๐ก๐ค๐๐ ๐ฉ๐๐ ๐๐ฉ๐ฉ๐๐ ๐๐ง'๐จ ๐๐ ๐๐๐๐ง๐๐จ๐จ. This swift action safeguarded the FTP server from unauthorized access and potential data compromises.
I closely documented the entire attack workflow, revealing how OSSEC's precise alerts and decisive preventive capabilities shielded the system against exploitation. Working on this project has been an absolute blast! ~
The project kicked off by configuring the LAN interface, the gateway to my local network. It involved defining the Alias, Interface type, and IP address, subnet mask, and other crucial settings for this interface.
The second task was setting up a DHCP server on the FortiGate firewall, automating IP address assignment and simplifying network administration.
I skillfully configured the default route, specifying the gateway IP address that directs traffic beyond the local network, guaranteeing proper internet and external network accessibility. Furthermore, I actively monitored the default route using diagnostics to ensure its proper functionality.
I set up an Antivirus Profile on FortiGate and tested its effectiveness using the EICAR test file. Web filtering was also implemented to prevent network congestion, boost employee productivity, and block inappropriate content.
I utilized application control to manage and monitor specific applications within the network. I also configured IPsec VPNs for secure remote access and followed best practices for SSL VPN configuration to ensure maximum security.
Regular system maintenance and monitoring tasks were crucial for optimal FortiGate operation. Additionally, I leveraged the FortiGuard Security Fabric to integrate various security components, using cloud logging to enhance threat analysis.
Overall, exploring FortiGate 7.4 has been a rewarding experience, and I gained valuable insights into its capabilities. :)
โ 04/2024
In this project, I explored how to use the built-in Windows security program, Applocker, to control which applications users can run.
I'll cover the basics of setting up AppLocker rules using Group Policy Management and provide step-by-step instructions on how to enable Application Identity and create new rules.
Applocker is a powerful tool that allows administrators to control which applications can be run on a Windows system by creating rules that exclude certain executables, windows installer files, and DLLs from running. The default rules are based on paths, with all files under those paths being included in the list of allowed apps.
Set up AppLocker rules using Group Policy Management in a domain environment. The process involves opening the Group Policy Management window, navigating to the appropriate GPO settings, and implementing new rules for allowing or denying certain applications.
In order to use Applocker effectively, you need to enable the Application Identity setting on your system. This section explains how to do this by configuring a Group Policy object (GPO) with specific settings related to defining and enforcing AppLocker policies.
Once you've enabled Application Identity, you can create new rules for Applocker that will allow or deny specific applications based on your organization's security needs.
scroll down under the left sidebar and navigate to Computer configuration -> Policies -> Windows Settings -> Security Settings -> Application Control Policies. Expand Application Control Policies, select and click on AppLocker.
Denied Access to the selected service.
In order to use Applocker effectively, you need to enable the Application Identity setting on your system. This section explains how to do this by configuring a Group Policy object (GPO) with specific settings related to defining and enforcing AppLocker policies.
-๐ฌ๐ต/๐ฎ๐ฌ๐ฎ๐ฐ
In this project, I explored how to use the built-in Windows security program, Applocker, to control which applications users can run.
I'll cover the basics of setting up AppLocker rules using Group Policy Management and provide step-by-step instructions on how to enable Application Identity and create new rules.
Applocker is a powerful tool that allows administrators to control which applications can be run on a Windows system by creating rules that exclude certain executables, windows installer files, and DLLs from running. The default rules are based on paths, with all files under those paths being included in the list of allowed apps.
Set up AppLocker rules using Group Policy Management in a domain environment. The process involves opening the Group Policy Management window, navigating to the appropriate GPO settings, and implementing new rules for allowing or denying certain applications.
In order to use Applocker effectively, you need to enable the Application Identity setting on your system. This section explains how to do this by configuring a Group Policy object (GPO) with specific settings related to defining and enforcing AppLocker policies.
Once you've enabled Application Identity, you can create new rules for Applocker that will allow or deny specific applications based on your organization's security needs.
scroll down under the left sidebar and navigate to Computer configuration -> Policies -> Windows Settings -> Security Settings -> Application Control Policies. Expand Application Control Policies, select and click on AppLocker.
Denied Access to the selected service.
In order to use Applocker effectively, you need to enable the Application Identity setting on your system. This section explains how to do this by configuring a Group Policy object (GPO) with specific settings related to defining and enforcing AppLocker policies.
~๐ฌ๐ต/๐ฎ๐ฌ๐ฎ๐ฐ